Chocolate Cake Truffles!
March 31, 2011
These are completely cute, and so easy! I made them for a baby shower that a friend of mine was hosting this afternoon, and they turned out just as I planned…
…once I got the right coating! I’d had visions of small white truffles with baby blue polka-dots or stripes, but unfortunately the Piggly-Wiggly didn’t have the required vanilla candy coating bark for this scenario. So, last night I finished the chocolate half, and tried to cover some in white chocolate that I’d tinted blue. While they were passable, white chocolate proved way fussy to work with, which just made for messy truffles. SO, today I ventured into Winchester to scout for the right stuff, and was successful at grocery store 2. The joys of living in rural Tennessee…!


(the reject white-chocolate blue truffles are of the “fortunate” mistake variety, meaning my suitemates and I have been on quite the 24-hour sugar-high.)
Oh, and one more thing–you can very well make these with any combination of store-bought cake and icing! This is actually the method in all recipes I’ve encountered for these–just use 1 box cake mix and 1 can of frosting. I admit I did just that last year for Valentine’s Day, with red velvet/cream cheese. (I’m not sure if I’ve admitted as much to Will before now…) They were delicious, but in a Little Debbie “oh my God I love this and I don’t know why” kind of way. Which is fine, but not something I wanted to deliver to a mother-to-be…not sure I even want to know how those tastes/textures are contrived! The cake I made instead is adapted from Martha Stewart’s one-bowl chocolate cupcakes recipe; it has oil and buttermilk, so I knew it would be a moist but substantial cake that would hold up well in the mash with frosting. Seriously just as easy as a mix, and so much better!
Chocolate & Cream Cheese Cake Truffles
(Cake truffle concept from bakerella.com; cake adapted from Martha Stewart’s Cupcakes; frosting adapted from allrecipes.com)
Yields about 4 dozen
– Ingredients –
For the cake:
1 1/2 c flour
3/4 c cocoa powder
1 1/2 c sugar
1 1/2 t baking soda
3/4 t baking powder
3/4 t salt
2 eggs
3/4 c buttermilk
3 T vegetable oil
1 t vanilla
3/4 c warm water
For the Frosting:
2 (8 oz) packages of cream cheese
1/2 c (1 stick) butter, softened
1 t vanilla
2 c powdered sugar
1 package chocolate candy coating bark
1 package vanilla candy coating bark
– Directions –
1) Make the cake: preheat oven to 350 F. Butter and flour a 9×13 inch baking pan. Whisk together flour, cocoa, sugar, baking soda, baking powder, and salt. Add the eggs, buttermilk, oil, vanilla, and the water; beat until smooth and combined, scraping down sides of bowl as needed. Pour batter into prepared pan and bake for about 40 minutes, or until a toothpick inserted in the middle comes out clean. Let cool in the pan for about 15 minutes, and then invert onto a wire rack.
2) Make the frosting: combine cream cheese and butter together in a large bowl until smooth. Add the vanilla. Add the powdered sugar and whisk until smooth. Take about 1/3 out of the bowl and reserve for piping.
3) When the cake is cool, break it up and toss it into the big bowl of the cream cheese frosting. With a fork, mash together the cake and frosting until the mixture is homogenous. Finally, roll into 1″ balls and put them on a parchment lined baking pan. Refrigerate for at least an hour or overnight.
4) Dip the truffles: Microwave the coating bark according to the directions, and then toss each ball in the tray to cover (I use a spoon for this–to roll it around etc.). Using the spoon, carefully finagle it onto a cookie sheet lined with parchment paper. To avoid a buildup of coating around the base of the truffle, I try and let a lot of it drip back into the tray before letting the truffle roll onto the parchment. Once they’re dry, decorate however you want! I had some left-over cream cheese frosting, so I dyed it blue (a few drops of blue food coloring, plus a drop of yellow, to get that robbin’s egg blue) and piped!

Oatmeal Chocolate-Chunk Muffins!
March 29, 2011
I’m back! From what has to have been the most demanding academic ordeal I’ve ever had. My comprehensive exam was last Saturday, so the entire week and a half prior to this blessed event revolved around illegible notes from every English class I’ve taken (occasionally slept through) over the past 3.75 years. And unlike my usual school-mode, there was no room for procrastination. So, no baking! It was horrible.
(the anticipation, not the exam-which actually wasn’t that bad at all. I don’t think any dreaded event, besides maybe a guillotine, is bad enough to warrant the kind of stress that the human mind is capable of producing. The only other time I’ve ever been that stressed was before the LCB exam, and again! It was much better than nerves would have even allowed me to imagine).
So actually I was wrong when I said my week consisted only of notes. There was coffee; a lot of it. Over the past four years I’ve become addicted to the Starbucks off of I-24, in Manchester, TN. It’s about a 20-25 minute drive from Sewanee, which is just long enough for me to clear my head before sitting down to work again. And it’s not the coffee or spinach-feta wrap (delicious!) that I’m addicted to, it’s the people, who by this point I can happily claim as great friends. They’re to thank for keeping my sanity in tact, and keeping me cheerful despite the joint-stiffening hours spent sitting, reading in my corner.
Which brings me to these muffins that I made today, as a thank you! I had some oats, buttermilk and honey, so when I saw this recipe, it was just downright providential. And I’m such a sucker for buttermilk because it truly does amazing things for taste and texture. Total two birds with one stone kind of thing. Anyway, these are the tangible definition of a good muffin: subtle in sweetness, fluffy in texture, and perfect for breakfast.
P.S.; The original recipe didn’t include the cinnamon or chocolate, so feel free to omit to no ill effect. I just feel like the cinnamon adds a sense of warmth/coziness that I crave in a muffin, and…chocolate speaks for itself.

Oatmeal Chocolate-Chunk Muffins
Adapted from: http://www.thekitchenarian.com
Yields 1 dozen regular sized muffins
Ingredients:
1 c buttermilk
1 c rolled oats
1 egg
1/4 c honey
l t vanilla
1 c flour
1/2 t salt
1 t baking soda
dash of cinnamon
1 c chocolate chunks
1/3 c butter, melted
– Directions –
1) Preheat the oven to 425 F. Line a muffin pan with muffin paper lines or grease individual cups with butter.
2) Soak the oats in buttermilk for at least 30 minutes. Beat egg and vanilla into oat mixture. Warm the honey slightly in the microwave (or over stove) so that it mixes easier. Add the honey to the oat mixture and combine thoroughly. Whisk together flour, salt, baking soda, and cinnamon; then add the chocolate chunks and toss to coat.
3) Gently fold the flour mixture into the oatmeal/buttermilk until barely combined, and then add in the melted butter. Mix until just combined, as the muffins will be tough if the batter is over mixed. And then! Sprinkle the tops with some sugar for a nice sweet crunch on the top! Bake 15-20 minutes until browned.
Ah, and you know what, these would have been amazing with some orange zest thrown in. Next time!

Happy St. Patrick’s Day!
March 17, 2011
I really love the holidays that kind of sneak up on you, providing a last minute reason to party. Valentine’s Day, St. Patrick’s Day, etc. Not major enough for class or work to be canceled, but still a good reason for doing something out of the ordinary. Or for adding an extra flair of festivity to pre-existing plans….in my case, baking. And drinking.
I made this cake the other day in anticipation of St. Patrick’s day, and it is absurd. I knew it probably couldn’t be bad, given the amount of recipes that are out there for Guinness/chocolate cakes, but geez. I didn’t think it was going to be this good, and I’m pretty sorry I hadn’t tried it sooner. The cake tastes remarkably like a chocolate cake my grandmother makes, that has a wonderfulness beyond any adjective I’ve thought of in the past 2.5 minutes.
The frosting, too, is perfect here. I’d never paired chocolate with cream cheese, and when I got to thinking about why, realized that there’s no good reason. I suppose cream cheese frosting is (almost exclusively) used for cakes with warm spices or flavors, such as carrot cakes and the like. In these scenarios the tangy coolness is a major compliment…one that could seamlessly be shared with the richness of chocolate. And that combination is exactly what this recipe delivers–a quite luxurious 1-layer chocolate cake with a hint of beery cheer, smoothed over with a lovely, creamy frosting.
(I had a mini bottle of Bailey’s and decided “the more the merrier” when making the frosting…which I highly recommend, I think it’s one of the best frostings I’ve ever, ever had.)

Also, a bit of timing advice….that is, if you like Guinness. I started baking in the early afternoon, which meant that at 2 something I had an open Guinness on my hands. Minus 1 cup, but from a draught can that still leaves enough to constitute drinking before 5. If this is not a situation you’d be comfortable faced with, then start after 5. (or decide you’re done driving for the day and go with it)
Guinness-Chocolate Cake with Bailey’s Cream Cheese Frosting
(Adapted from Nigella Lawson)
– Ingredients –
For the cake:
1 c Guinness Stout
10 T (1 stick + 2 T) butter
3/8 c cocoa powder
2 c superfine sugar (I used regular to no ill effect!)
3/8 c sour cream
2 eggs
1 T vanilla
2 c flour
2 1/2 t baking soda
For the frosting:
1 1/4 c powdered sugar
8 oz. cream cheese, room temperature
1/2 c heavy cream
1 T Bailey’s cream
– Directions –
1) Heat oven to 350 F. Butter a 9-inch springform pan and line the bottom with parchment paper. In a large saucepan, combine Guinness and butter. Place over medium-low heat until butter melts, then remove from heat. Add cocoa and sugar and whisk to blend.
2) In a small bowl, combine the sour cream, eggs, and vanilla; mix well and add to Guinness mixture. Add flour and baking soda, and whisk until smooth. Pour into buttered pan and bake until risen and firm, about 45 minutes to 60 minutes. Place pan on wire rack and let cool completely in the pan.
3) To make the frosting: Whisk the powdered sugar to break up any lumps, then add the cream cheese and blend until smooth. Add the heavy cream and Bailey’s and mix until smooth and spreadable.
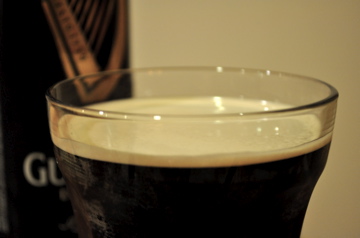
4) Remove cake from pan and place on a platter or cake stand. Ice top of cake only, so that it resembles a frothy pint of Guinness. (I did this and then…decided it needed a little something else. So! I cut out a parchment paper shamrock, placed it on top, and dusted cocoa powder over it.)

And music! Growing up, The Chieftains were a major part of any road-trip, and finally became a staple in my mom’s car (along with The Corrs, Enya, and Clannad…clearly we’re partial to our Irish roots!). It’s kind of impossible to have a favorite among their songs, though I can never get enough of the instrumental medleys:
And at this point, I have an intense travel craving. Which brings me to these pictures I have from the trips my family used to take over Christmas. (…the past tense is killing me there!) Such a beautiful (and fun!) country!


Strawberry Mascarpone Tarts with Madeira Glaze!
March 13, 2011
I made these tarts last night as the dessert for a family dinner (I’m home for spring break!), and they were amazing! It’s the kind of dessert that, as it was coming together, made me increasingly excited. Everything just worked– each component turned out exactly how it was supposed to be. The crust was crisp; the filling was smooth and delicate; the strawberries were sweet; the Madeira sauce delivered a warm, subtle richness. …a perfect spring or summer dessert!
The original recipe is for a 10-inch tart, but I think there’s something so delightful about having an individual dessert. I’d ordered miniature molds so I could replicate the tarts I made at Le Cordon Bleu, and after the success of last night, anticipate a major miniature tart phase coming on!

Strawberry Mascarpone Tarts with Madeira Glaze
Adapted from epicurious.com
(originally a 10-inch tart with a Port glaze)
– Ingredients –
For the tart shell:
1 1/4 c flour
3 T sugar
1/4 t salt (generous)
7 T butter, cut into 1/2 inch pieces
1 egg yolk
1/2 t vanilla
1/2 fresh lemon juice
3 T cold water
For filling:
1 pound mascarpone (about 2 cups)
1/4 c powdered sugar
1 t fresh lemon juice
1/2 t grated lemon zest
3/4 t vanilla
For the strawberries & glaze:
1 1/2 pound strawberries (about 1 1/2 quarts), trimmed and halved lengthwise
1/3 c sugar
3/4 c ruby Port (or Madeira!)
– Directions –
1) Make tart shell: Blend together four, sugar, salt and butter in a bowl with your fingertips or a pastry blender (or pulse in a food processor) just until mixture resembles coarse meal with some roughly pea-size butter lumps. Beat together yolk, vanilla, lemon juice, and water with a fork, then drizzle over flour mixture and stir with fork (or pulse) until mixture comes together.
2) Gently knead with floured hands on a lightly floured surface until a dough forms, then gently knead 4 or 5 times. Press into a disk. At this point, I divided the dough into six portions for the six miniature rings I had, and rolled the dough before lining it so it would be even and smooth. I recommend this method for smaller tarts, but if following the original sized recipe, then take these steps: Place disk in center of tart pan and cover with plastic wrap, Using your fingers and bottom of a flat-bottomed measuring cup, spread and push dough to evenly cover bottom and side of pan. prick bottom of tart shell all over with a fork and freeze until firm, about 10 minutes.
3) Preheat oven to 375 F with rack in the middle. Line tart shell with foil and fill with pie weights. Bake until side is set and edge is pale golden, about 20 minutes. Carefully remove foil and weights and continue to bake until shell is deep golden all over, about 20 minutes more. Cool in pan, about 45 minutes.
4) Make filling while tart shell cools: Stir together strawberries and granulated sugar in a bowl and let stand, stirring occasionally, 30 minutes. Strain in a sieve set over a small saucepan, reserving berries. Add Madeira (or Port) to liquid in saucepan and boil until reduced to about 1/4 cup, 10 to 15 minutes. Transfer to a small bowl to cool slightly.
5) Meanwhile, whisk together mascarpone, powdered sugar, lemon juice, zest, vanilla, and a pinch of salt until stiff.
6) Assemble tart: Spread mascarpone mixture evenly in cooled tart shell(s), then top with strawberries. Drizzle Madeira glaze all over tart.
**Note: If you are planning to make this for a dinner party dessert, plan on assembling it as close to the serving time as possible. I made everything in the afternoon, but waited until right before I left for dinner to fill the tarts, and also didn’t refrigerate them (to ensure that the crust wouldn’t get soggy). I brought the strawberries/Madeira glaze with me in separate containers, and warmed up the glaze a bit before drizzling and serving.

Chocolate-Zucchini Muffins!
March 9, 2011
These are favorites among favorites! I made them about a year ago, and upon remembering their warm, rich flavor, had to do it again this past weekend…rainy days make for excellent bake-athons.
To me, the chocolate/zucchini combination is the chocoholics answer to carrot cake. Like shredded carrots, zucchini keeps the crumb phenomenally moist, and seems to just disappear into the chocolate oblivion that is this muffin. Last time I’d topped them with a goat cheese/cream cheese frosting…which was surprisingly delicious and gave them a nice zippy tang, but this time around I left them plain. Though they are really not “plain” at all–quite rich actually–and a marvelous excuse to have chocolate for breakfast.
Chocolate-Zucchini Muffins
Adapted from http://www.101cookbooks.com/archives/000281.html
Yields about 2 dozen standard sized muffins
– Ingredients –
1 1/2 c brown sugar
1/4 c butter, melted
3/4 c vegetable oil (or coconut oil, as recommended by the original site. I tried it this time around, and had delicious results!)
3 eggs
1 t vanilla
1/2 c buttermilk
2 c grated zucchini
1 c chocolate chips
2 c flour
1 c cocoa powder
1/2 t salt
2 t baking soda
1 t allspice
1 1/2 t cinnamon
– Directions –
1) Pre-heat oven to 350 degrees F. Lightly grease a muffin pan or line with paper cups.
2) In a medium bowl mix together the sugar, butter and oil. Beat in eggs, one at a time until well Incorporated. Stir in vanilla, buttermilk, zucchini and chocolate chips.
3) In a separate bowl mix together all of the dry ingredients. Add the liquid ingredients and mix until well combined. Spoon batter into large muffin pans. Bake in the center of the oven for about 35 minutes.

They’ll also make your house smell incredible… I’m such a sucker for the chocolate + spice combination!
Orange-Cardamom Madeleines!
March 7, 2011
Yesterday was the quintessential rainy day. Dark and drizzling for the duration that I was awake, it necessitated a puzzle, Will’s acoustic guitar, and tea. Lots of tea. And what better snack accompaniment than madeleines?
I’d been intrigued by these flavors for some time, and was so excited to finally make this recipe! While the cardamom+orange combination was as delightful as I thought it’d be, the texture left something to be desired…too sturdy. I think texture is the key variable to what constitutes a good madeleine, and the original LCB recipe is so far unsurpassed in its deliverance of a light, fluffy crumb every time. So! I’m going to advise (post) the LCB recipe again, with the cardamom and orange glaze additions. Should be even better than the ones I made yesterday, which were still delicious!

Orange-Cardamom Madeleines
(If you don’t want to mess with a kitchen scale/want to go with Martha but don’t have that cookbook– http://www.marthastewart.com/recipe/orange-cardamom-madeleines )
Yields about 1 dozen
– Ingredients –
200 g butter
3 eggs
130 g sugar
200 g flour
10 g baking powder
30 g honey
60 ml (g) milk
1 t vanilla extract (or 1 vanilla bean’s seeds)
3/4 t cardamom
For the glaze:
3/4 c powdered sugar
zest of 1 orange
2 T fresh, strained orange juice
– Directions –
1) Melt the butter on the stove. Whisk the eggs and sugar together in a medium bowl until pale, about 2-3 minutes by hand. Add the flour and baking powder, mix gently (and not too much) until smooth.
2) Add the honey, stir. Add the milk and vanilla extract, stir. Add the vanilla and cardamom, stir.
3) Add the melted (still warm) butter, mix. After scraping the sides of the bowl down with a spatula, cover and refrigerate the dough to let it rest…overnight is best, but at least a half hour will do. This is just so it will rise better and more attractively.
4) When ready to bake, turn the oven on to 400 F. Butter the madeleine pan with very soft (or even creamed) butter, making sure to get into each of the ridges, and then dust with flour, shaking out excess.
5) Spoon a tablespoon of dough into each shell mold, and bake for about 10 minutes. The edges will be darkened before they’re done, so what you really want to judge by is the bump that will rise in the middle. When that is very, very pronounced, and you can smell them without having opened the oven door, then they’re likely ready. To be absolutely sure, you can put a finger on one of them to see how firm it is. Basically, they should feel like the top of a perfectly baked muffin.
6) After taking them out of the oven, un-mold them immediately onto a flat, cool surface (not a cooling rack, or else the ridges will make indentations on them!).
7) Make glaze: Stir together sugar, orange zest and juice in a small bowl until glaze is smooth, thick, and opaque. Using a small pastry brush, coat ridged side of each cookie with glaze (or just hold the edges and dunk the top into the glaze to cover, before setting on a wire rack for the excess to run off).
And no good rainy day is complete without Nick Drake or Leonard Cohen. …I’m going with this song by the latter because I think Suzanne would like these.
Homemade Dulce de Leche + Alfajores!
March 4, 2011
So, home-making dulce de leche is just about the best idea that I never had. For whatever reason I’d never really considered it on my “to-bake/do” list, but thank goodness the situation basically fell into my lap because, it is absolutely one of my favorite things I’ve ever created in the kitchen. I made it last night for some alfajores cookies, which were the dessert for a South American dinner that Julia catered.
Dulce de leche is a carmelized milk sauce that’s popular throughout South America, in a number of different sweet recipes. There are varying ways to make it, from the slow but steady double-boiler method (which I did) to the risky (bizarre?) boiling a can of evaporated milk(!). I chose the double-boiler so I could go about making other things, remembering to stir only every ten minutes or so for…1 hour…2 hours…3 hours. !!! Despite the lengthy amount of time, it still seems to me like the most hassle-free. It worked beautifully, and was well worth not having to stir constantly, worrying about its burning (or exploding(?) the can).
!This is seriously delicious! I’m following up with a recipe for the Alfajores cookie dough, but you could make the dulce de leche to put on anything–swirling it in ice cream would be a great decision. I don’t even love ice cream and I want that!

Dulce de Leche
– Ingredients –
1 (14 oz) can of condensed milk (about 1 1/2 cups)
1 (12 oz) can of evaporated milk (about 1 2/3 cups)
1/2 t baking soda
generous pinch of salt
2 cinnamon sticks
1 T corn syrup
1 t vanilla
– Directions –
1) Place the evaporated milk and the condensed milk in a large, shallow heat-proof bowl. Add the cinnamon sticks, baking soda, and pinch of salt if desired.
2) Place over a large pot of boiling water (burner on medium), and making sure that the bottom of the bowl is not in the water, let cook, stirring every so often. After awhile check to be sure that the water hasn’t all evaporated away (I added more water twice!). The mixture will slowly begin to thicken and darken slightly in color. Keep stirring, and be patient!
3) Cook and stir until the mixture is making big slow bubbles and is very thick. Lift the spoon out of the pot and drizzle some of the caramel over the surface. If it forms a ribbon that does not disappear after 10 seconds or so, it is ready. Also check by dragging the spoon along the bottom of the bowl. You should be able to see the bottom of the bowl for a few seconds before the thickened mixture closes in on itself and covers the bottom.
4) Remove from heat and let cool for 5 minutes. Remove cinnamon sticks, and stir in the vanilla and corn syrup. Let cool completely and serve (over ice cream, cheesecake, or in these alfajores!).
Alfajores
– Ingredients –
1 c cornstarch
1 3/4 c flour
1/2 t baking powder
1 t salt
1 c butter
1/2 powdered sugar
1-2 T Pisco or Brandy
1 t vanilla
1 c dulce de leche
– Directions –
1) Preheat the oven to 350 F. Place the cornstarch, flour, baking powder, and salt in a bowl and mix briefly. Add the butter and blend with your fingers until the mixture is smooth.
2) Add the powdered sugar, vanilla, and Pisco or Brandy, and mix with your hands until the dough is homogeneous and smooth (add a little extra Pisco or Brandy if dough is too crumbly to form a ball). Let the dough rest in the refrigerator for 30 minutes.
3) Roll out the dough to 3/8″ thickness, and cut into 2 inch circles. Place cookies on baking sheet lined with parchment paper. Bake cookies for 10-15 minutes, until they are barely golden brown. Let cookies cool on pan for 5 minutes before transferring them to a rack to cool completely.
4) To fill the cookies, spread one cookie with dulce de leche and top with second cookie. Store in an airtight container.

I think it’s pretty clear that last night was a long night of baking, and…I can’t forget to mention how much fun it was! The other people at Julia’s are completely great and I always learn so many new things from them. For instance…I was introduced to Cocorosie’s latest album (Grey Oceans), which, with major volume, is an awesome experience. This song started and I was hooked:
Almond-Brown Butter Cake!
March 2, 2011
This is a really delightful cake reminiscent of the dacquoise that I was so fond of this summer (and which I still need to blog!). The almond flavor comes purely from those ground in the batter, while the browned butter, vanilla beans, and rum add really nice depth to it. Unlike some almond cakes that make you feel like you’re eating straight extract with a few other ingredients, this one has a gentleness to it that’s sweet but not overdone. The texture is really nice too, and particularly dacquoise-esque. The ground almonds keep it moist while the beaten egg whites keep it light. Can’t recommend it highly enough!

Almond-Brown Butter Cake
From Fine Cooking’s Easy Desserts
– Ingredients –
10 T (1 1/4 sticks) butter
1/2 vanilla bean
1 1/2 c sliced almonds
1 1/2 c sugar
1 c plus 2 T flour
8 egg whites
pinch of salt
2 T dark rum
– Directions –
1) Preheat the oven to 350 F. Grease a 9-inch round cake pan. Line the bottom of the pan with a circle of parchment paper; grease the parchment. Dust the pan sides and parchment with flour.
2) Melt the butter in a small saucepan over medium-low heat. Split the vanilla bean and scrape the seeds into the butter. Add the scraped pod to the pan. Heat until the butter is light brown and gives off a nutty aroma, stirring frequently, about 5 minutes. Watch it carefully, because it will burn quickly after it browns. Remove from the heat and let stand for 10 minutes. Discard the vanilla bean and pour the butter through a fine strainer to remove the burnt solids. Set aside to cool.
3) Reserve 1/4 c of the almonds. Place the remaining 1 1/4 c almonds and 3/4 c sugar in the bowl of a food processor and grind fine. Add the flour and pulse to combine.
4) Place the egg whites in a large mixing bowl with the salt and beat until foamy. With the mixer on high, add the remaining 3/4 c sugar in a slow, steady stream and whip until the whites are shiny and hold stiff peaks. Fold in the flour mixture in three additions, alternating with the butter mixture and ending with the flour. Fold in the rum.
5) Scrape the batter into the prepared pan and smooth with a spatula. Scatter the remaining 1/4 c of almonds over the batter. Bake until golden and a toothpick inserted into the center of the cake comes out dry, about 35 to 40 minutes.
6) Let the cake cool in the pan for 10 minutes, invert it onto a wire rack, and then turn it right side up again to cool completely. Dust heavily with powdered sugar before cutting into wedges, and serve. Store uneaten cake in an airtight cake container or wrap in plastic and store at room temperature for up to 2 days.

While this doesn’t necessarily have the frosted centerpiece effect that you may want from a cake, its humble elegance belies an amazing interior that earns it a place alongside coffee at any dinner-party’s end. Or a weekend brunch!
