Chocolate Bird’s Nest Cake!
April 26, 2011
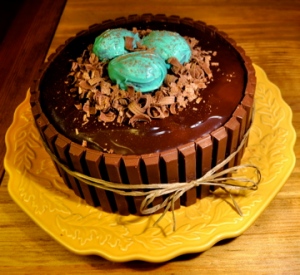
So I guess that Easter Monday is the best time to wrap up the holiday baking, and here goes the best for last. The vanilla egg cake was last week’s project, and this one I made for the real deal, Easter dinner. Beneath it’s themed decor is a mixture of various cake recipes that I threw together; the chocolate cake layers are simply marvelous, sandwiched with an Amaretto-whipped cream-mascarpone filling, and finished with dark chocolate ganache. I will definitely be making this again, for a birthday or other event! The cake layers are extraordinarily soft and fluffy; the whipped filling has a delicately sweet flavor; and the dense ganache brings it all together by off-setting the sweetness and grounding each bite with the fabulous richness of good dark chocolate. It’s kind of perfect.
A decorative bird’s nest is always an easy way to finish a cake or cupcakes for spring; we used shaved milk chocolate for the nest, and the scraps from the cake leveling for cake truffle eggs, covered in robin’s-egg-blue dyed white chocolate. In retrospect, so that they’d have been smooth, I should have a) used vanilla candy coating bark or b) made a white chocolate ganache. Not really a big deal, though, and I actually ended up liking the textured egg…a bit rustic, and from a food standpoint, I think it definitely looks more appealing to sink your teeth into. And the Kit-Kats! I remembered seeing that idea awhile ago on one or two other blogs, and thought it’d be perfect for a woodsy theme.
Chocolate Bird’s Nest Cake
(cake & ganache from marthastewart.com; filling from epicurious.com)
– Ingredients –
For cake:
1 1/2 c (3 sticks) butter, plus more for pans
3/4 c Dutch-process cocoa powder, plus more for pans
1/2 c boiling water (or hot, freshly brewed coffee!)
2 1/4 c sugar
1 T vanilla
4 eggs, lightly beaten
3 c sifted cake flour
1 t baking soda
1/2 t salt
1 c milk
For filling:
1 1/2 8-oz. containers mascarpone cheese (12 oz)
1 1/2 c chilled heavy whipping cream
3 T sugar
1 T vanilla
1 T Amaretto
For ganache:
8 oz. semi- or bittersweet chocolate, finely chopped
3/4 c heavy cream
2 T corn syrup
For decorations:
8 oz. milk chocolate bars (I used Cadbury–absolutely delicious)
8 oz. white chocolate, finely chopped (or vanilla candy-coating bark)
– Directions –
1) Make cakes: Preheat oven to 350 F. Arrange two racks in center of oven. Butter three 8×2″ (I used three 9×2″ pans–); line bottoms with parchment. Dust bottoms and sides of pans with cocoa powder; tap out any excess. Sift cocoa into a medium bowl, and whisk in boiling water. Set aside to cool.
2) Cream butter until light and fluffy. Gradually beat in sugar until light and fluffy; beat in vanilla. Drizzle in eggs, a little at a time, beating between each addition until the batter is no longer slick, scraping down the sides of bowl as needed.
3) In a large bowl, sift together flour, baking soda, and salt. Whisk milk into reserved cocoa mixture. With mixer on low speed, alternately add flour and cocoa mixtures to the batter, a little of each at a time, starting and ending with flour mixture.
4) Divide batter evenly among the three prepared pans. Bake until a cake tester inserted into center of each layer comes out clean, 35-40 minutes (about 25-30 if in 9″ pans). Transfer layers to wire racks; let cool 15 minutes before turning them out onto the racks to cool completely.
5) Make mascarpone filling: beat together all ingredients just until soft peaks form (do not over-beat or else the mixture will curdle). Refrigerate until using.
6) Level the cake layers and put the scraps into a bowl. Place the base cake layer onto a platter. Spread about a third of the mascarpone mixture on top before adding the middle cake layer. Repeat with the middle/top layer addition. Next, thinly coat the entire cake with the remaining mascarpone frosting; make sure that the top isn’t too crumby since the ganache won’t hide bumps, but don’t worry about the sides if you plan on using the Kit-Kat idea. After this step I refrigerated it, so that it would stand up to the pouring of ganache well.
7) Cut apart the Kit-Kat bars so that you’ll be able to place them onto the cake immediately after the ganache. Make the ganache: put the chocolate, cream, and corn syrup into a heatproof bowl set over a pan of simmering water, and stir until smooth. Let stand 5 minutes, then pour over the cake, reserving about 1/3 cup to use for the cake truffle eggs. Refrigerate cake until firm, about 15 minutes.
8 ) Make the nest decorations: Using a chef’s knife, scrape milk chocolate bar at a 90-degree angle, forming enough curls and shards to measure 1 1/2 cups (I hereby learned that shaving chocolate is actually Will’s secret superpower-). Transfer to a rimmed baking sheet or plate, and refrigerate until ready to place atop the cake.
9) Make the cake truffle eggs: add the 1/3 cup of ganache to the cake scraps and mash with a fork until you have an even consistency. Form egg sized balls and refrigerate for half an hour or until firm enough to shape into an egg. When ready, either melt/dye vanilla candy-coating bark or white chocolate; roll the egg in it to cover before spooning it onto a parchment lined plate to set.
10) Finally, set the milk chocolate shards/curls on top of the cake, followed by the eggs. Take a picture before enjoying a slice!
Happy Easter!
April 24, 2011
Hope you’re all enjoying a beautiful Easter!
As usual I’ve managed to go a bit overboard with the holiday as an excuse to bake in bulk. That said, I did most of it in advance so I can now focus on my most favorite of holidays, Easter, instead of cake layers.
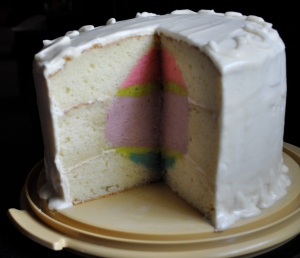
…after a brief post!: this cake is a blast to make (if time consuming…Will and I made it a weekend affair!), as well as the best vanilla cake I’ve ever had (somewhat like my mom’s famous hot milk cake in taste/texture). I’d certainly recommend it without the inside kitsch (let’s be honest, that’s what it is–), though there is something amusingly delightful about a food-dyed surprise.
(Think I got enough parentheses in there?)
Love and joy to all of you this Easter day!
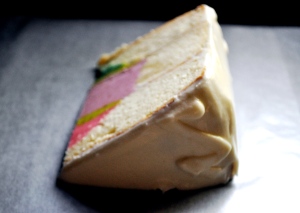
P.S….That slope is what happens when you don’t level your cake layers!!! An elementary aspect of beautiful cake making, and a duty I’ve usually shirked in my prioritizing–sometimes exclusively–deliciousness over aesthetics. (LCB fail! Need to start making myself adhere to the standards drummed into my head last summer!)
I’m giving directions for the whole ordeal, but at heart this is a fantastic and simple cake to be made given any opportunity.
Also, Will thought it’d be fun to mix it up a bit and make the egg a different flavor than the rest of the cake, so, we added a tiny hint of orange extract to the color mixtures…definitely a fun/good idea!
Perfect Vanilla White Cake
(adapted from Magnolia’s vanilla cupcake recipe, found here)
Yields 24 cupcakes or 1 cake
– Ingredients –
For the cake:
1 1/2 c self-rising flour
1 1/4 c all-purpose flour
1 c (2 sticks) butter, softened
2 c sugar
4 eggs, room temperature
1 c milk
1 t vanilla
For the icing:
1 c (2 sticks) butter, softened
6 to 8 c powdered sugar
1/2 c milk
2 t vanilla (it will be more pristine if you can use a clear extract)
1 t almond extract (optional)
– Directions –
1) Preheat oven to 350 F. Butter three 9″ pans and line bottoms with parchment paper; butter the parchment too. In a small bowl, combine the flours. Set aside.
2) In a large bowl, cream the butter until smooth. Add the sugar gradually and beat until fluffy. Add the eggs, 1 at a time, beating well after each addition.
3) Add the dry ingredients in 3 parts, alternating with the milk and vanilla. With each addition, beat until the ingredients are incorporated but do not over beat. Using a rubber spatula, scrape down the batter in the bowl to make sure the ingredients are well blended. Carefully spoon the batter into cake pan. Bake for 20 to 25 minutes (for round cake), or until a cake tester inserted into the center of the cake comes out clean. Wait 5 minutes before inverting the cakes onto a wire cooling rack; let cool completely before putting in the refrigerator to chill for at least an hour (they’re easier to carve that way; I left mine in for a few hours).
4) Make the icing: First of all, double the recipe (if making the egg)! Place the butter in a large mixing bowl. Add 4 cups of the sugar and then the milk and vanilla (and almond, if using). Beat until smooth and creamy. Gradually add the remaining sugar, 1 cup at a time, beating well after each addition, until the icing is thick enough to be of good spreading consistency. You may not need to add all the sugar. (Use and store the icing at room temperature because icing will set if chilled.) Icing can be stored in an airtight container for up to 3 days.
5) Assemble! The best thing to keep in mind before you start carving is that it’s best to take this slowly, and not get overzealous with the knife…much better to carve a little bit more here and there than to take away too much! Take out a large bowl that you can put the scraps in, since you’ll need them for the actual egg.
6) Ultimately you want your bottom layer to have a wide bowl cut out from the center, the middle layer to have a tapering hollow, and the top layer to have a narrow bowl. Before carving, use a ruler to determine the exact center of the cake, and what the diameter of the egg should be. Then draw the egg circumference on paper, cut it out and use it as a guide to trace the circle with a knife on the top center of the cake. Now there’s not really a way to describe how to do the carving, just do what seems geometrically right, keeping track of how far you are from the bottom of the cake. A toothpick inserted in the center of the bowl you carve is a good way to do this, and you can mark it with a pencil so you can do the same with the top layer. This will ensure that the egg is centered within the cake.
7) Divide the cake scraps into four bowls, and put a bit of icing and a drop of orange extract into each. Mix with a fork until you have an even consistency, and add food dye one drop at a time, mixing well after each drop (we used the neon colors–blue, pink, purple, and green).
8) Place the bottom layer on a serving platter, and put the blue mixture into the carved bowl, followed by half of the green mixture. Ice the edges around the green.
9) Place the middle layer on top of the bottom, and fill with the purple mixture. Top with the remaining half of the green; ice the edges around the hollow. Fill the top layer’s hollow with the pink mixture, and…okay to be honest, don’t remember how exactly we finagled this top layer on, flipping it upside down (when I said this was a “weekend affair,” I meant that we did this late night alongside many Paulaners). I suppose it works best if you have two people, one to pick up the cake, the other to hold the filling in place as you flip it over and transition it.
10) Finally! Ice the entire cake with a crumb coat and put in the refrigerator for at least an hour before putting on the final smooth coat of frosting. And then cut yourself the largest slice of cake you’ll ever kid yourself into thinking you can get through.
Dress-Up Buttermilk Cupcakes!
April 22, 2011
I can’t believe it’s almost Easter! April always does this to me; spring break ends and then suddenly half of the next month is gone. I’d been planning to come up with all sorts of brilliant Easter recipes to bake at Julia’s, but unfortunately the academic part of my life has been more demanding recently, so that sort of fell through…starting next month though, I’m hopeful that each and every day will be devoted to pastry full-time…! Right, so I went in last night and decided that cupcakes would be the thing. Who can resist a fluffy cupcake? Especially when there are little bunnies on them calling your name?
I’d wanted a recipe that would make a ton of simple, easy to decorate cupcakes. A few pages into Martha Stewart’s cupcake book and I found it–yellow buttermilk cupcakes. Classic, deliciously satisfying, and by the dozens! These have an extremely tender crumb that’s as fluffy as the frosting–also by MS, which is easy easy and perfect for coloring/dressing up.
Which brings me to the decorations–bunnies. None of the grocery stores in the area (as in, on the mountain) carry marzipan, and Julia happened to have almond paste(!) to be put to use. I was apprehensive about using it for decorations, thinking of it only as the gritty, sticky deliciousness that’s meant for fillings, but was determined to make it work. And it did! Not sure I’d do it again, but without another alternative it was great. I just grabbed a handful and kneaded some food coloring into it; rolled it into a ball; flattened it between two pieces of parchment paper; used a rolling pin to continue rolling it out between the parchment paper; drew a bunny on a piece of paper; cut it out; and used it as a guide to trace (with a knife) on the rolled, colored paste. The only thing I’d do differently is draw a bigger bunny, which would have eliminated some of the tedium of the small and detailed knife work!
For really delicious, theme adaptable, crowd-pleasing cupcakes needed in bulk, these are definitely the way to go.
Yellow Buttermilk Cupcakes
(from Martha Stewart’s Cupcakes)
Yields 3 dozen.
– Ingredients –
Cupcakes:
3 c cake flour
1 1/2 c all-purpose flour
3/4 t baking soda
2 1/4 t baking powder
1 1/2 t salt
1 c plus 2 T (2 1/4 sticks) butter, room temperature
2 1/4 c sugar
5 whole eggs plus 3 egg yolks, room temperature
2 c buttermilk, room temperature
2 t vanilla
“Fluffy Vanilla Frosting”:
1 1/2 c (3 sticks) butter, room temperature
1 pound (4 c) powdered sugar
1/2 t vanilla
– Directions –
1) Preheat oven to 350 F. Line standard muffin tins with paper liners. Sift together both flours, baking soda, baking powder, and salt.
2) Cream butter and sugar until pale and fluffy. Add whole eggs, one at a time, beating until each is incorporated, scraping down sides of bowl as needed. Add yolks, and beat until thoroughly combined. Add flour mixture in three batches, alternating with two additions of buttermilk (add the vanilla along with one of the additions of buttermilk), and beating until combined after each.
3) Divide batter evenly among lined cups, filling each three-quarters full. Bake, rotating tins halfway through, until cupcakes spring back when lightly touched and a cake tester inserted in centers comes out clean, about 20 minutes. Transfer tins to wire racks to cool for a few minutes before turning them out onto the rack to cool completely. Cupcakes can be stored overnight at room temperature, or frozen up to 2 months, in airtight containers.
4) Frosting: Beat butter until pale and creamy. Add the powdered sugar, 1/2 c at a time, beating well after each addition and scraping down sides of bowl as needed. After every two additions, beat vigorously to aerate frosting, then return to regular (medium) speed. This process should take about 5 minutes. Frosting will be very pale and fluffy. Add the vanilla, and beat until frosting is smooth. If not using immediately, frosting can be refrigerated up to 10 days in an airtight container. Before using, bring to room temperature, and beat until smooth again.
5) To finish the cupcakes: use a small offset spatula (I used a spoon…) to spread cupcakes with frosting. And go with whatever decoration you want!
Unfortunately my pictures were taken at night, and the lack of natural lighting doesn’t do much for the colors…they’re quite bright, and I ended up being happy with the robbin’s egg blue frosting for the cupcakes sans bunnies. (just play around with the blue, yellow, and green food dyes until you get the hue you want!)
Pierre Herme’s Chocolate-Nutella Tart!
April 15, 2011
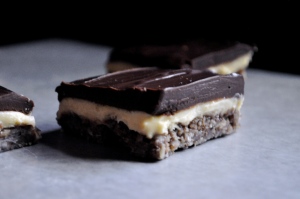
Another tart recipe! It’s pretty straightforward, and I liked it because it’s a nice balance of Nutella (super sweet) and dark chocolate (bittersweet). Though these flavors are rich, I think they work perfectly in a tart because you never get too much in a bite.
So…after the demo I swore to take a few days off, having baked almost everyday the entire preceding week. This was of course ridiculous, because I don’t handle down time very well, and the wheels in my brain inevitably spin me towards more projects. This week’s vow was doomed by the left over snickerdoodle tart batter, and by an extra jar of Nutella. And once I got to talking to my surrogate grandmother in Sewanee about her Nutella addiction, I couldn’t not make her this tart.
The second time around I used the crust recipe that was used for the snickerdoodle tart (obviously without the nutmeg), and added a bit of instant espresso powder and some grated semi-sweet chocolate. …to give a deeper level of flavor and a beautiful chocolate speckled appearance. Unfortunately I didn’t get any pictures of it, but it looked great!
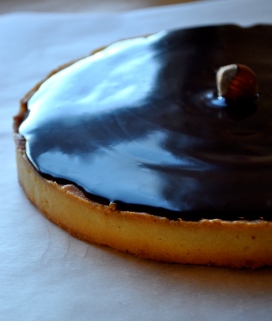
These pictures are of the tart I made for the demo; I think I got a little overzealous with adding the Nutella ganache (not in the original Pierre Herme recipe), so it got a little messy around the edges. I scaled down the proportions in the recipe so that you won’t end up with too much like I did (not that it’s a tragedy to have extra on hand…)! And! On top in the middle is a hazelnut. Unfortunately I didn’t have a nutcracker or the time to figure out alternate methods to cracking it, so it stayed whole. The grocery store randomly had what looked like a few hundred bags of them…wish you could buy them shelled/raw as easily as you can other nuts! They’re probably my favorite, and I think they’d look lovely scattered around on top of the tart.
Chocolate-Nutella Tart
(From Pierre Herme’s Chocolate Desserts)
Yields 1 9″ inch tart
– Ingredients –
For the tart shell:
1 1/3 c flour
pinch of salt
1/2 t cream of tartar
1/4 t espresso powder
1/2 c (1 stick) butter, cut into cubes and chilled
1/2 c plus 2 T powdered sugar
1 oz. block of semi-sweet chocolate
2 egg yolks
For the filling:
2/3 c Nutella
4 3/4 oz. bittersweet chocolate
7 T butter
1 egg, room temperature, stirred with a fork
3 egg yolks, room temperature, stirred with a fork
2 T sugar
For the ganache:
1/2 c Nutella (+ a bit more if you want, I think I ended up adding around 3/4 c)
1/2 c cream
– Directions –
1) Make tart shell: Whisk together the flour, cream of tartar, instant espresso, grated chocolate and powdered sugar in a large bowl. Add the cubed butter, and working swiftly so as not to melt the chocolate, incorporate with your hands until you have a uniformly crumbly mixture. Add the two eggs, and knead into a dough; Form the dough into a disc, wrap in plastic, and refrigerate for at least an hour, up to overnight.
2) Preheat oven to 350 F. Butter the tart pan. Roll pastry out on a lightly floured surface into a circle. Fit dough into prepared tart pan, pressing evenly over the bottom and up the sides. Line tart shell with parchment paper and fill with dried beans or pie weights. Bake tart for 20 minutes, or until edges are very light brown. Remove parchment paper and weights. Bake tart shell for 5-10 minutes more, or until lightly golden throughout. Cool completely on a rack before filling. Next, center a rack in the oven and preheat the oven to 375 F. Spread the Nutella evenly over the bottom of the cooled crust and set it aside while you make the filling.
3) Melt the butter and chocolate in separate bowls. Instead of messing with a double boiler for each, I just used the microwave, putting them in for about a minute, stopping to stir in 20 second intervals. Allow them to cool until they feel only just warm to the touch (104 F, as measured on an instant-read thermometer, is perfect).
4) Using a small whisk or rubber spatula, stir the egg into the chocolate, stirring gently in ever-widening circles and taking care not to agitate the mixture–you don’t want to beat air into it. Little by little stir in the egg yolks, then the sugar. Finally, still working gently, stir in the warm melted butter. Pour the filling over the Nutella in the tart shell. Scatter the toasted hazelnuts on top as well.
5) Bake the tart for 11 minutes. This should be just enough time to turn the top of the tart dull, like the top of a cake. The center of the tart will shimmy if jiggled–that’s what it’s supposed to do. Remove the tart from the oven and slide it onto a cooling rack. Allow the tart to cool and make the Nutella ganache.
6) Spoon 1/2 c Nutella into a heat-proof bowl. Heat 1/2 c heavy cream to a simmer over the stove, then pour over the Nutella. Let sit for a few minutes before stirring the mixture in tight circles, gradually widening. Spoon the ganache over the cooled tart.
Snickerdoodle Cheesecake Tarts!
April 14, 2011
Last night I did a tart demonstration for my dorm, and it reminded me of my favorite aspect of baking–how social it is! May seem trite, but I’ve always found that sugar really does bring out the fun side of a person. This was confirmed last night as I got to talk to many people in my dorm who I’d seen, but never spoken with. So many great people! And I was so happy to literally give them a taste of what I’ve chosen to do with my life. Sweets. No one ever really needs sweets, but they offer a moment of release beyond the demands and necessities of the everyday. A bite of something delicious is a suspension of the ordinary, and a chance to focus on just how exceptional life is.
I recently read a novel in my Southern American literature class that touched on this idea, using sugar specifically in a few instances. The book is Hold Autumn In Your Hand by George Perry, about a depression era family. The protagonist (Sam) finds himself in the grocery store with a bit left of the dollar he received from his new overseer. In choosing to spend the few leftover cents on candy for his children, he prioritizes their excitement and happiness over a rigid fixation on how hard the times are. He offers a taste of the extraordinary that, in its moment, undermines the ordinary and underlines the wonderful.
So while I’ve wondered at times how sensible my focus on sweets is, it’s on nights like last night that I remember it’s not sweets at all, but rather the chance to share joy with others that defines my passion.
And now! The tarts. I wanted to demonstrate something different (as opposed to cupcakes, cookies, etc.) so I opted for my favorite item I learned to make last summer. Tarts offer themselves to infinite possibilities of flavor, and there’s just so much you can do with them! Different layers of fillings, toppings, spins on the crusts, etc. Sadly I didn’t prepare any of the recipes that I learned at LCB as I’ve quite tragically and most accidentally left them at home. I couldn’t not have an homage to France though, so one of the recipes I prepared was Pierre Herme’s Nutella-chocolate tart…which was as amazing as it sounds. The only addition I made was a Nutella ganache! The next tart I chose to make in miniature tart rings, and it was a mascarpone key-lime tart with a graham cracker crust. Recipes to come!
The third, final, and (my) favorite tart was a snickerdoodle cheesecake. I seem to always forget that snickerdoodles are my favorite cookies, and they blow me away every time. I had some of the batter leftover, so today I made enough of the crust to bake off two mini-cheesecakes for a friend; those are the ones pictured (ooh, and P.S.–the crust might look a bit too dark on the bottom, but this is just an accumulation of cinnamon/sugar!).
These are seriously, seriously, seriously delicious. I believe my friend’s exact words this afternoon were, “I feel like I just bit into a bit of Heaven.”
Snickerdoodle Cheesecake Tart
(from culinaryconcoctionsbypeabody.com ; she is obviously a genius)
Yields 1 10″ tart
– Ingredients –
For the tart shell:
1 1/3 c flour
pinch of salt
1/2 t cream of tartar
1/4 t nutmeg
1/2 c (1 stick) butter, cut into cubes and chilled
1/2 c plus 2 T powdered sugar
2 egg yolks
For the cheesecake:
5 oz. cream cheese, room temperature
3 oz. mascarpone cheese, room temperature
1/2 c butter, room temperature
1/2 c sugar
2 eggs
1/4 t nutmeg
1/4 t cream of tartar
1 t vanilla
1/2 t cinnamon
additional 2 T sugar and 1 T cinnamon for sprinkling
– Directions –
1) Make the tart shell: Whisk together the flour, cream of tartar, nugmeg, and powdered sugar in a large bowl. Add the cubed butter, and incorporate with your hands until you have a uniformly crumbly mixture. Add the two eggs, and knead into a dough. Form the dough into a disc, wrap in plastic, and refrigerate for at least an hour, up to overnight.
2) Preheat oven to 350 F. Prepare tart pan by buttering pan and then sprinkling cinnamon sugar around the sides and on the base. Roll pastry out on a lightly floured surface into a circle. Fit dough into prepared tart pan, pressing evenly over the bottom and up the sides. Line tart shell with parchment paper and fill with dried beans or pie weights. Bake tart for 20 minutes, or until edges are very light brown. Remove parchment paper and weights. Bake tart shell for 5-10 minutes more, or until lightly golden throughout. Cool on a rack before filling.
3) Keep oven at 350 F. Make the filling: combine the cream cheese, mascarpone cheese, sugar, and butter. Beat until light and fluffy. Add eggs, one at a time, scraping down the bowl after each addition. Add vanilla and beat until incorporated and smooth. Add the nutmeg, cinnamon and cream of tarter and beat until fully incorporated. Spread filling evenly in prepared tart shell.
4) Bake for 20-25 minutes, or until center is set and edges are light golden. Remove pan from the oven and allow tart to stand for two minutes. Sprinkle with cinnamon sugar.
5) Eat warm(!). Keep refrigerated, up to 3 days.
White-Chocolate Chip Pistachio Muffins!
April 9, 2011
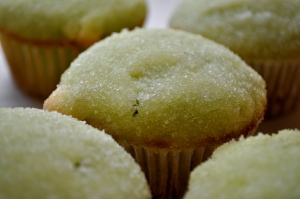
I’m not totally sure how to categorize these; I suppose that a muffin is basically a cupcake without icing, just like a cupcake is a muffin with icing. These can really float both boats: if you want an indulgent sweet but not a full-blown-frosted cupcake, look no further than this recipe. But if nothing less than full-blown-frosted will cut it then by all means frost away. They’ll be delicious no matter what!
These were a major favorite with my friends when I made them last year, and I was happy when they were requested as the designated birthday treat for a celebration yesterday! The white chocolate chips are my addition; I think they compliment the intensity of the pistachio. And the crunch of sugar on top is my favorite way to finish muffins, just adds a nice textural contrast (not to mention taste). If you want to go the frosted route, then I’d recommend a white chocolate icing, involving cream cheese or sour cream.
And they really are a ridiculously nice shade of green.
White-Chocolate Chip Pistachio Muffins
(Adapted from Cooks.com)
Yields about 1 1/2 dozen
– Ingredients –
1 3/4 c flour
2 1/2 t baking powder
1/2 t salt
1 (1 oz., 4 serving size) package instant pistachio pudding mix
2/3 c sugar
1 c white chocolate chips
2 eggs, lightly beaten
1 1/4 c milk
1/2 c canola oil
1 t vanilla or 1/4 t almond extract
For the topping:
1/4 c butter (1/2 stick), melted
1 c sugar
– Directions –
1) Preheat oven to 350 F. Grease a muffin tin or line with paper cups. In a large mixing bowl whisk together flour, baking powder, salt, pudding mix, sugar, and white chocolate chips.
2) In a small bowl combine beaten eggs, milk, oil and vanilla or almond extract. Stir into flour mixture just until combined. Fill muffin cups 3/4 full.
3) Bake for 18-20 minutes or until golden brown, and a toothpick inserted in the middle comes out clean. Let them cool a few minutes, or until you can handle them. Meanwhile, melt butter (easily done in a microwaveable bowl, with a wide brim for dipping) and put the sugar into another wide-brimmed bowl. Dip the muffin tops into the melted butter and then immediately into the sugar, and set on a wire rack to cool. Enjoy!


